6.0 Users
6.1 User Information
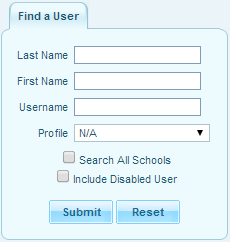
This option gives you all the necessary details of a particular user. After clicking on this tab you can use the fields provided in the main working area to search for users in diverse ways under the selected academic year in HAPASIS. This appears at many places and it works the same where ever you see it in HAPASIS. Few tips are provided below on how to use the “Find a User” to search for uses in HAPASIS.

- When you click on “Submit” without selecting anything you will get a list of all the users in the current selected academic year.
- You can search for users by their Last Name, First Name, Username, or their Profile. For example if you type in “James” in the “First Name” field and click on “Submit” button you will get the details of all users by the “James” as their first name in the School in the academic year in question. You can narrow your search by combining any of the fields for example “First Name” and “Last Name” or “First Name” and “Profile” or “First Name” and “Last Name” and “Profile” etc.
- You can select a specific “Profile” from the “Profile” drop down and will get the details of that profile’s users.
Note: You can combine any of the fields including the “Advanced Search” in you search.
After the search, the page displays a user’s fundamental information. This includes his name, username, password, profile, school, email address, and phone number. You can change any of this information by clicking on the value you want to change, changing the value, and clicking the “Save” button at the bottom of the page.
6.2 Add a User
This page allows you to add a user to the system. This includes administrators, teachers, class/form teacher, house master/mistress, accountant, assistant accountant and parents. Simply fill in the new user’s name, username, password, profile, school, email address, and phone number and then Click the “Save” button.
Note: No two users can have identical usernames. Only the “Red” marked fields are mandatory.

6.3 Associate Students with Parents
This page allows you to associate students to parents.
Once a parent’s account has been set up, their children must be associated to their account with this program. Parent’s accounts are associated to their children account at the time of adding a student by entering the guardian information. If for any reason that was not done you can always go back and enter such information.
If you have the parent information already in HAPASIS but not associated with the child’s information this option “Associate Students with Parents” will help you do that.
To Associate Students with Parents
- Go to Users —> Associate Students with Parents
- If you have not already chosen a user earlier in your session, select a user by using the “Find a User” Search screen.
- Next, search for a student to add to the user’s account.
- From the search result, you can select any number of students. You can select all the students in the list by checking the checkbox in the blue column headings above the list.
- After you have selected each desired student from this list, click the “Add Selected Students” button at the top of the screen.
To Disassociate Students from Parents
- Go to Users —> Associate Students with Parents
- If you have not already chosen a user earlier in your session, select a user by using the “Find a User” Search screen.
- At any time after a user has been selected, you can see the students already associated with that user. These students are listed at the top of the student search screen / search results.
- These students can be disassociated from this user by clicking the delete icon
 next to the student you wish to disassociate from the user.
 - You will be asked to confirm this action click “OK” to confirm.
6.4 Preferences
6.5 Import Teachers
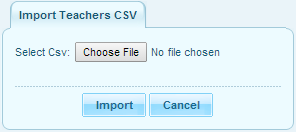
This option allows you to import list of teachers and parents into HAPASIS with all theirs details on a single predefined “CSV” file. This option reduces your work by manually entering teachers one by one.
To Import Teachers
- Download the predefined “CSV” file
- Fill in the teachers details and save the file
- Go to Users —>Import —> Import Teachers. You will see the image below

6.6 Assign Staff
This page allows you to assign a “Class/Form” to class form master/mistress. Class Form master/mistress needs to have access to the class before he/she can perform his/her normal duties as class master using HAPASIS. A form master can mark students’ attendants, conducts and interest. To assign a teacher as a form master follow the steps below.
To Assign Class/Form Teacher
- Go to Users —> Assign Staff —> Assign Class/Form Teacher.
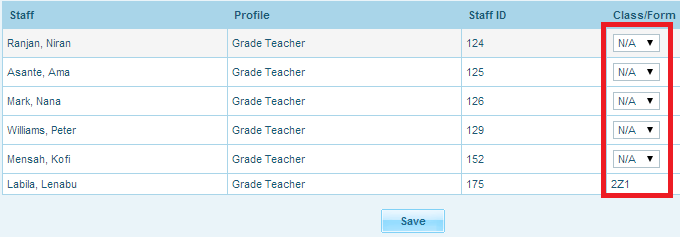
- You will see a list of staff members you assigned “Class/Form Teacher” as their profile when creating them as users.
- Select (assign) a class for them by using the drop down under “Class/Form”
- Click the “Save” button

6.7 Setup
6.7.1 Profiles
This page allows you to deny access and/or write privileges to any module for any user in HAPASIS. You can administer the sections of the application what a user can access and edit. This option is available for only administrators other users of the system will not see this page except the administrator has given that user access to the page.
Grant or Deny permissions to user groups
- Go to Users —> Setup —> Profiles.
- Click on a profile you want to grant or deny permissions from the left pane
- Their Permissions will load into the right pane with check boxes attached to what they can use and edit.
- Select or deselect a permission you want to grant or deny to the user group. Use the checkboxes to define which programs the administrator can use and which programs he can use to modify information.
- Scroll down and click on the “Save” button
Note: If a user cannot use a particular program, the program will not be displayed on his menu. If he can use the program, but can’t edit information with the program, the program will display the data, but won’t let him change it.
6.7.2 User Permissions
This page allows you to view the access right for a user. After clicking on this tab you can use the fields provided in the main working area to search for users in diverse ways under the selected academic year in HAPASIS.
Note: You can only view their access right. To make changes to their permissions user “Profiles”
6.7.3 User Fields
This page allows you to create custom fields for demographic information on a user.
To Add New User Fields
- Go to Users —> Setup —> User Fields
- Click on add icon to create a new user field
- Give “Title”, “Sort Order” and select user role
- You can also choose to assign view rights to c for that field
- Then click on the “Save” and you have successfully created a new user field
6.8 Teacher Programs
6.8.1 Grade Book Grades
This tab allows the administrator to give the grades, remarks, interest and conducts on behalf of the teacher.
After you click on this tab you will get a list of the teachers. Now you need to select the teacher on behalf of whom administrator wants to give grades. After you select the teacher you can choose period. Then you will get a student list. From that list you need to select the student and you would be able to grade that student on behalf of that particular teacher.


