4.0 School Setup
4.1 Portal Notes
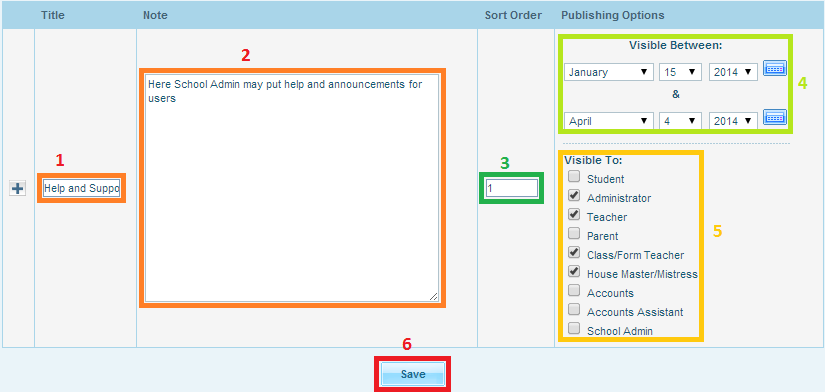
This page allows you to add Notes to the system. Notes help to keep users of the system informed about any new developments in the School. You can choose the time period for which the specific note will be visible to users. You can also specify which users can view the Notes.
To Add a Note
- Enter the Title of your note.
- Enter the content of your note (Note information) in the Note filed
- Enter sort order (optional)
- Select visibility period using the calendar
- Select/check the users you want the notes to be visible to
- Click on “Save” button
To modify a note
- Click on any of the note’s information
- Change the value
- Click the “Save” button
To delete a note
- Click the delete icon
 next to the note you want to delete.
 - You will be asked to confirm the deletion. (see image below)

4.2 Marking Periods
The Marking Periods page is where you setup your school’s marking periods for a school year. There are four default tiers of marking periods added during the installation: Year, Semesters, Quarters, and Progress periods. HAPASIS installation scripts create 3 Terms under Semester by default. However you can always have more or fewer as required by your school. Similarly, there can be any number of progress periods in a given quarter.
To add a marking period
- Click on the Add button icon
 in the column corresponding to the type of marking period you want to add.
 - Then, complete the marking period’s information in the fields above the list of marking periods and click the “Save” button.
Note: Notice that neither two marking periods nor two posting periods in the same tier can overlap dates.
To edit a marking period
- Click on the marking period you want to change
- Click on whatever value you want to change. It will automatically become editable.
- Update the value and click the “Save” button.
To delete a marking period
- Select it by clicking on its title on the list
- Click the “Delete” button at the top of the screen.
- You will be asked to confirm the deletion.
Note: You cannot delete a marking period if it has students assigned to periods in that marking period.
4.3 School Calendar
This page allows you to setup your school’s calendar for the year. The calendar displays the current month by default. The month and year displayed can be changed by changing the month and year pull-down menus at the top of the screen and clicking the “Update” button.
On full school days, the checkbox in the upper right-hand corner of the day’s square should be checked. For partial days, the checkbox should be unchecked and the number of minutes school will be in attendance should be entered into the text box next to the checkbox. For days on which there will be no school, the checkbox should be unchecked and the text field should be blank. To uncheck the checkbox or change the number of minutes in the school day, you must first click on the value you want to change. After making any changes to the calendar, click the “Update” button at the top of the screen.
To setup your calendar at the beginning of the year
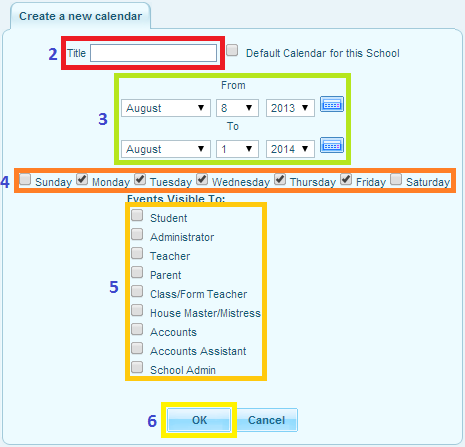
- You should use the “Create this year’s calendar” feature. By clicking on this link in the upper right-hand corner of the screen
- Enter a title for your calendar. You may set the calendar as the default calendar for the school
- Select the beginning and ending dates of your school’s school year and the days of the week that your school meets
- You can also select which days of the week that your school is in session.
- Select the category of users you want the calendar to be visible to.
- Click the “OK” button. You can now go through the calendar and mark holidays and partial days
The calendar is also a display of school events. This can include everything from teacher in-service days to sporting events. These events are visible by other administrators as well as parents and teachers at your school.
To add a school event
- Click on the add icon in the lower left-hand corner of the event’s date.
- In the popup window that appears, enter the event’s information and click the “Save” button.
- The popup window will close, and the calendar will be automatically refreshed to display the added event.
To modify an event
- Click on the event you want to modify
- Click on the values you want to change.
- Change the event’s information in the popup window that appears
- Click the “Save” button. The window will close and the calendar will automatically refresh to display the change.
4.4 Periods (School Periods)
This page allows you to setup your school’s individual class periods. The HAPASIS installation script creates a group of default periods. Update these periods to match yours and delete the extra periods created during installation if necessary.
Middle and high schools will likely have multiple periods in a school day, where elementary schools may have only one period (called All Day) or perhaps three (All Day, Morning, and Afternoon). If required, you can add new periods very easily.
To add a period
Fill in the period’s title, short name, sort order, and length in minutes in the empty fields at the bottom of the periods list and click the “Save” button.
To modify a period
- Click on any of the period’s information
- Change the value, and click the “Save” button.
To delete a period
- Click the delete icon next to the period you want to delete.
- You will be asked to confirm the deletion.
- Click “OK” to confirm deletion
4.5 Class/Form Levels (School Grade Levels)
This page allows you to setup your school’s grade levels. By default the HAPASIS installer creates all the grades from Kindergarten to the 8th Grade. If your school has a different grade level structure, simply delete the extra Grade Levels. Similarly if you have some grades that have not been created, create them on this page.
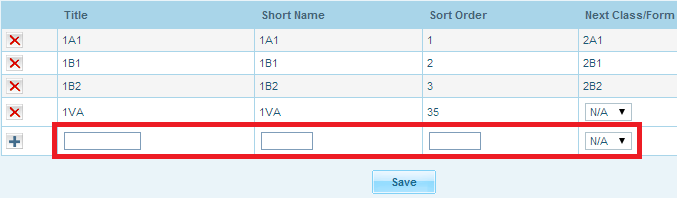
To add a class/form level
- Fill in the grade level’s title, short name, sort order, and next class/form in the empty fields at the bottom of the grade levels list. The “Next Class/Form” field indicates the grade students in the current grade will proceed to in the next school year.
- Click the “Save” button.
To modify a class/form level
- Click on any of the class/form’s information
- Change the value, and click the “Save” button.
To delete a class/form level
- Click the delete icon next to the class/form you want to delete.
- You will be asked to confirm the deletion, click “OK” to confirm deletion
Note: You cannot delete class/form levels that are associated to students. To delete such class/form levels you must first remove students from such class/form levels before deletion
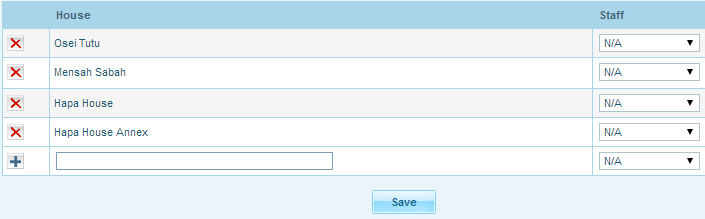
4.6 Houses
This page allows you to setup your school’s houses or hostels. By default the HAPASIS installer creates few houses. If your school has a different house names, simply edit the house names to suit your school. Similarly if you have some extra houses that have not been created, create them on this page.
To add a house
- Fill in the house’s title in the empty field at the bottom of the houses list.
- Select the house master/mistress in charge of the house at the bottom of the staff list
- Click the “Save” button
Note: The “Staff” field indicates the house master/mistress in charge of the house. (Click here to see how to add house master/mistress)
To modify a house
- Click on any of the house’s information
- Change the value, and click the “Save” button.
To delete a house
- Click the delete icon next to the house you want to delete.
- You will be asked to confirm the deletion, click “OK” to confirm deletion
Note: You cannot delete houses that are associated to students. To delete such houses you must first remove students from such house before deletion
4.7 School
4.7.1 School Information
The automated installer creates a default school during installation. Once logged in, you can update the existing information with your School’s Information. Change the name, address, logo and principal etc. of the current school from this page.
To edit and change the default school information
- Simply click on the existing text and it will become an editable text input field.
- Enter the updated information and click “Update”.
Note: You also have the option to delete the school. However you cannot delete a school if you have existing students enrolled in that school.
4.7.2 Upload School Logo
This tab allows you to upload your school logo in HAPASIS. The logo you add will show up in all the reports that you can print from the system. E.g.: Report Card, Transcripts, Advanced Report, Schedule Report and so on.
- First you need to save your school’s logo somewhere in your computer
- Then click on “Upload School Logo” option
- Then select the file (the logo)
- Finally click on Upload and you schools’ logo is added in HAPASIS.
4.7.3 Upload Signature
4.7.4 Add a School
- This page allows you to add a school to the system. Complete the school’s information, and hit the “Save” button.
- To switch to the new school you just added, change the school pull-down menu on the top from your current school to the new one.
4.7.5 Copy School
This page lets you make a copy of your existing school. The data copied includes School Periods, Marking Periods, Report Card Grade Codes, Report Card Comment Codes, Eligibility Activity Codes, Attendance Codes and Grade Levels.
4.7.6 System Preference
This page has five different options. The entire tab allows you to set the system as per your preference.
4.8 Courses
4.8.1 Course Manager
This page allows you to create Programmes, courses and course periods.
- By clicking on the add icon you can create any number of programmes you want.
- Enter programme title for the programme you want to create in the text field that appears at the top.
- Click the “Save” button to save the programme you want to add

4. After you create the programme, you will get the option to create courses under that particular programme.
5. Click on the add icon ![]() under courses
under courses
6. Fill in the course title and short name
7. Indicate the status of the course subject (core or elective)
8. Indicate the placement aggregate status of the course subject (Yes or No)
9. Indicate the certificate aggregate status of the course subject (Yes or No)
10. Select the class/form level you want to allocate the course subject
11. Click the “Save” button.

12. After you finish creating courses you will get an option to create course periods under a particular course.
13. Here you have to give the Short Name, Teacher, Grading scale, marking period etc. (see below for the explanation of these terms)
14. Click the “Save” button at the top right corner
Note: After you schedule students under that course periods you won’t be able to delete that course.

a) Short Name:
b) Room:
c) Teacher:
d) Period:
e) Grading Scale:
f) Secondary Teacher:
g) Marking Period:
h) Seats:
i) Calendar:
4.8.2 Aggregates
This page lets you configure the number of course subjects for both core and elective subjects you want to use for placement aggregates and certificate aggregates. By default the HAPASIS installer creates 3 course subjects for placement aggregates and certificate aggregates. If your school has a different format, simply edit the values to suit your school. To edit just click on the value, the value will be editable.

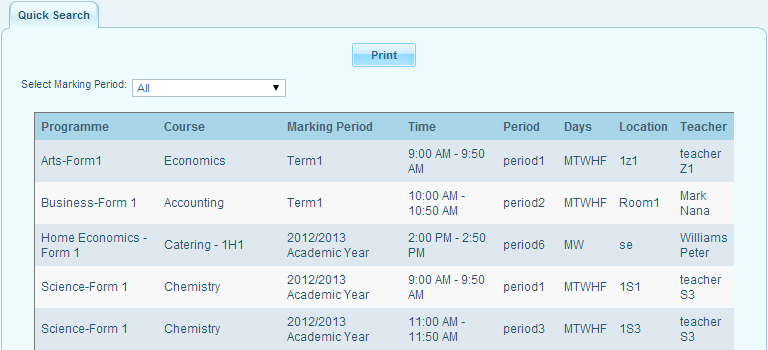
4.8.3 Course Catalog
This option gives you the entire details of the course manager like a chart. Here you will get all the information about the Programmes, Courses, Marking Periods, Time, Period, days when that course is taught, location(room no) and the teacher teaching that course. In this page you have options to choose from dropdowns. There are two options through which you can search. Select Marking period and Select Subject. After you complete the search it gives you an option to take a print out of all the details.
4.8.4 Print Catalog By Term
This option gives you the course catalog by term. You will get the dropdown to select the term and you can take the print out of it.

4.8.5 Print Catalog By Class Level
4.8.6 Print All Courses
This option allows you to take a print out of all courses. Here you will get all the required details of subject, courses and course period.
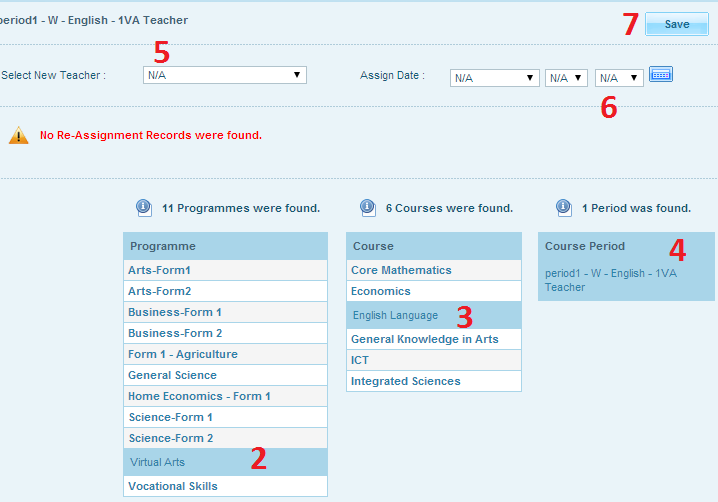
4.8.7 Teacher Re-Assignment
During creation of “course subject periods” teachers were assigned to every subject’s period to take charge of the course subject (see point [12-14] under 4.8.1 Course Manager). It is not possible to change the teachers in charge of the course subjects after scheduling the course subjects to students directly from the “course subject periods” interface. To replace the teachers previously assigned to the subject’s periods use the “Teacher Re-Assignment”.
To re-assign a teacher
- Got to School Setup à Courses à Teacher Re-Assignment
- Click on the programme under which you want to change the teacher. All the courses (subjects) under the selected programme will appear at the right side of the programmes
- Click on the Course(subject) under which you want to change the teacher. The course period under the selected course (subject) will appear at the right side of the courses
- Click on the course period
- Select the new teacher you want to assign the course to
- Select the date you want the re-assignment of the new teacher to take effect Note: select the current date if you intend changing the teacher right away
- Click on the “Save” button