8.0 Grades
1.0 Report Cards
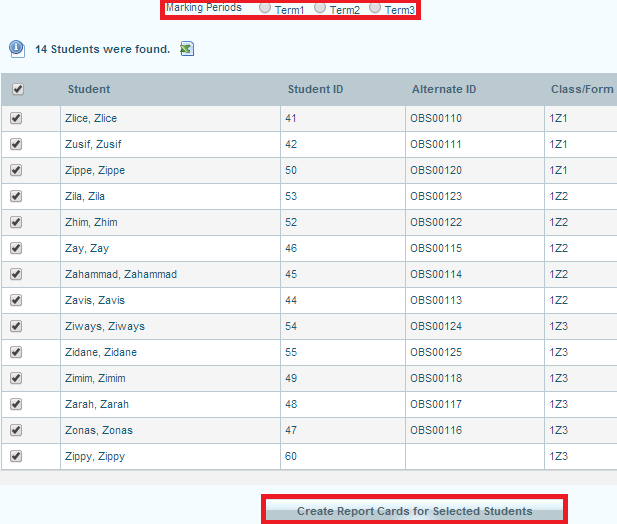
This utility allows you to print report cards for any number of students.
How to Print Student Report Card
- Go to –> Grades –> Report Cards
- Perform your search criteria in the “Find a Student” working area and click on “Submit” button. (More information on how to use Find a student)You can search for students who are enrolled in a specific course by clicking the “Choose” link next to the “Course” search option and choosing a course from the popup window that appears.
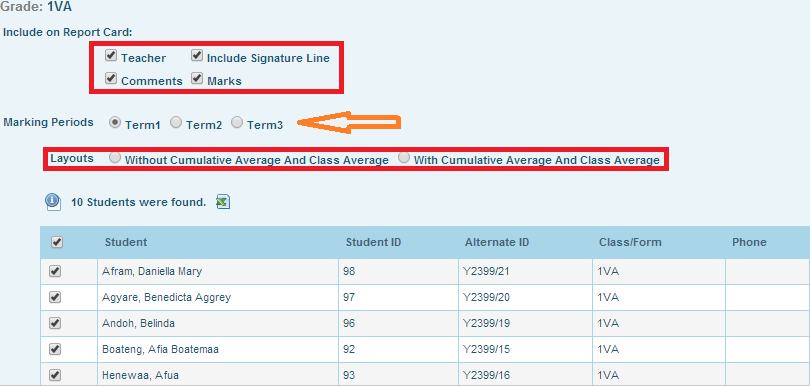
- Also, you can choose to print the report cards with mailing labels, Comment & Remarks, Signature Line. The report cards will have mailing labels positioned in such a way as to be visible in a windowed envelope when the sheet is folded in thirds. More than one report card may be printed per student if the student has guardians residing at more than one address.
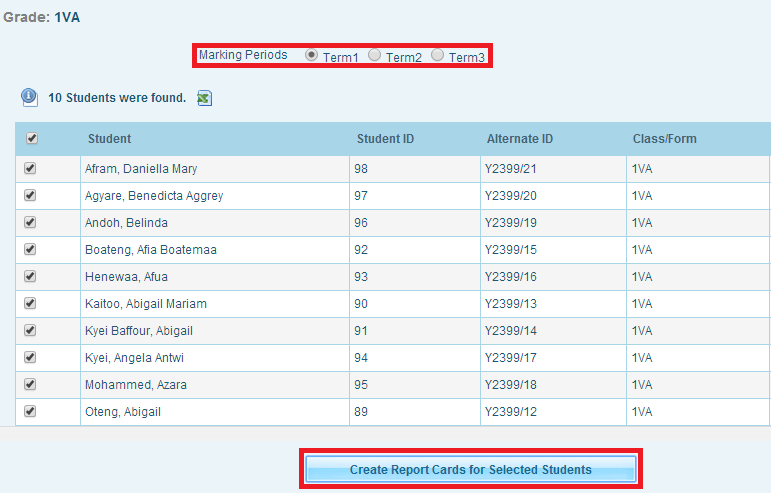
- Before printing the report cards, you must select which marking periods to display on the report card by checking desired marking period checkboxes, select your desired layout.
- Select the list of students you want to print their report cards
- The report cards will be automatically generated in a printable PDF format when you click the “Create Report Cards for Selected Students” button.
2.0 Calculate GPA
3.0 Transcripts
This utility allows you to print transcripts for any number of students.
How to Print Transcripts
- Go to –> Grades –> Transcripts
- Perform your search criteria and click on “Submit” button (More information on how to use Find a student). You can search for students who are enrolled in a specific course by clicking the “Choose” link next to the “Course” search option and choosing a course from the popup window that appears.
- Before printing the transcripts, you may select “Include Student Picture” to display on the transcript
- The transcripts will be created in a printable PDF format when you click the “Create Transcripts for Selected Students” button.
4.0 Reports Overview
This page allows you to generate a course report for a particular programme, a programme offered in a school may contain several classes e.g. A progrmme called “Business” may have these classes “1B1,1B2,1B3,1B4”. This page will help you print a comprehensive report for all the various programmes in your school. If you want a report for a single class in a programme please use Class Reports. The generated report includes students position in class, class average, name, student ID and their individual classes. You can as well export this report to excel format for Printing.
How to Generate Course Report
- Go to Grades –> Reports Overview –> Course Reports
- Select a course(programme) from course drop down in the main working area and click on “Submit” button.
- In the next page you will be presented with marking periods and list of students in the course programme you selected
- Select a marking period and click on “Create report cards for selected students“
- The report will be generated in the main working area with export icon to export the report to excel
This page allows you to generate a class report for a particular class. This page will help you print a comprehensive report for all the various classes in your school. If you want a report for the entire programme(course) please use Course Reports. The generated report includes students position in class, class average, name and student ID. You can as well export this report to excel format for Printing.
How to Generate Class Report
- Go to Grades –> Reports Overview –> Class Reports
- Select a class from “Class/Form” drop down in the main working area and click on “Submit” button.
- In the next page you will be presented with marking periods and list of students in the class you selected
- Select a marking period and click on “Create report cards for selected students“
- The report will be generated in the main working area with export icon to export the report to excel
4.3 Cumulative Average Report
This page allows you to generate a cumulative average report for students in a particular class. This report picks the averages earned by a student in all the academic terms and then find a total average from the averages (Cumulative Average). This report is generated in a printable PDF format for easy Printing.
How to Print Cumulative Average Report
- Go to Grades –> Reports Overview –> Cumulative Average Report
- Select a class from “Class/Form” drop down in the main working area and click on “Submit” button.
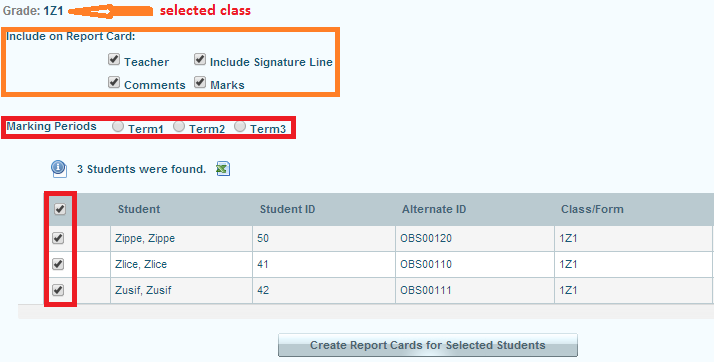
- In the next page you will be presented with items to be included on the report, marking periods and list of students in the class you selected
- Select items you want to include on the report, a marking period and the list of students you wish to print the reports for
- Click on “Create report cards for selected students“
- The report will be generated in a printable PDF format for easy Printing.
 4.4 Class Performance Report
This page allows you to generate a class performance report for students in a particular class. This contains all the subjects taken in a class, the best three(3) students for every subject in the class, the weak three(3) students for every subject in the class and overall best & weak three(3) students in the class. This report is generated in a printable PDF format for easy Printing.
How to Print Class Performance Report
- Go to Grades –> Reports Overview –> Class Performance Report
- Select a class from “Class/Form” drop down in the main working area and click on “Submit” button.
- In the next page you will be presented with marking periods and list of students in the class you selected
- Select a marking period
- Click on “Create report cards for selected students“
- The report will be generated in a printable PDF format for easy Printing.
 4.5 Term Examination Summary
This page allows you to generate Term examination summary report for students in a particular class. This report contains the total marks scored in every subject taken in the class, number of subjects passed, number of subjects failed, sum total of all the scores, total average and positions of students in the base on their performance. Students on this report are arranged in the order of their position in the class(from First to Last). This report is designed purposely to be pasted on notice boards for students to know their general performance in the class. This report is generated in a printable PDF format for easy Printing.
How to Print Term Examination Summary Report
- Go to Grades –> Reports Overview –> Term Examination Summary
- Select a class from “Class/Form” drop down in the main working area and click on “Submit” button.
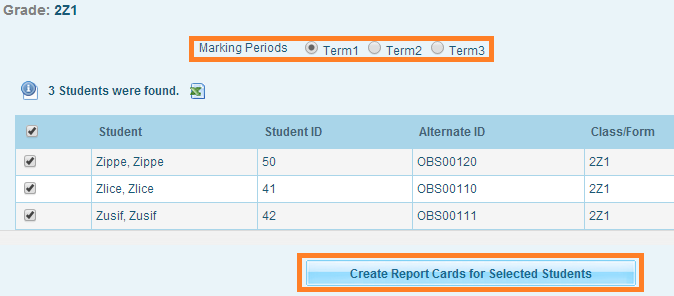
- In the next page you will be presented with marking periods and list of students in the class you selected
- Select a marking period
- Click on “Create report cards for selected students“
- The report will be generated in a printable PDF format for easy Printing.
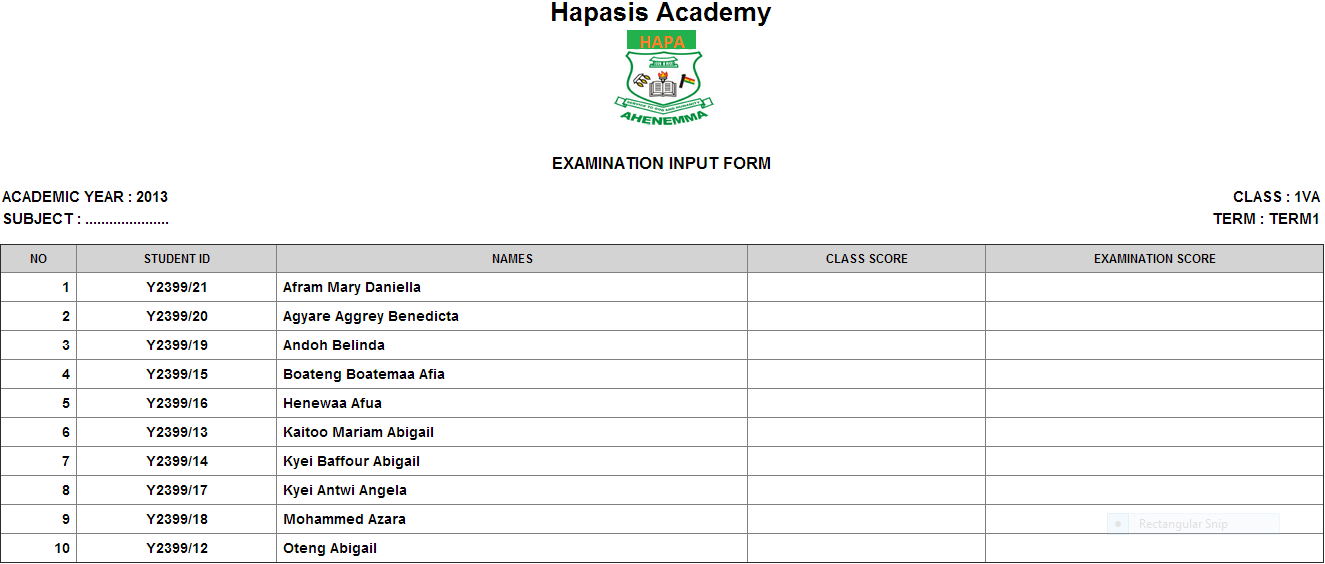
4.6 Examination Input Form
This page allows you to print Examination Input Form for a particular class. This form is designed purposely to be printed for teachers when they marking their examination script. The teachers will have the list of students in their class nicely arranged in the same order as they do appear in HAPASIS. The Examination Input Form contains students ID, names and empty class & examination scores column. The teacher’s duty here is to fill in the class & examination scores column for the students. This form is very helpful for the reason that students are numbered on the form so it is easier to find a student on the form and also the order of how they appear on the form is the same for HAPASIS therefore during inputting students scores into HAPASIS you will not need to search for students before you enter their scores. This report is generated in a printable PDF format for easy Printing. (see a sample below)
How to Print Examination Input Form
- Go to Grades –> Reports Overview –> Examination Input Form
- Select the class you want to print their examination input form from “Class/Form” drop down in the main working area and click on “Submit” button.
- In the next page you will be presented with marking periods and list of students in the class you selected
- Select a marking period
- Click on “Create report cards for selected students“
- The report will be generated in a printable PDF format for easy Printing.
5.0 Reports
5.1 Student Final Grades
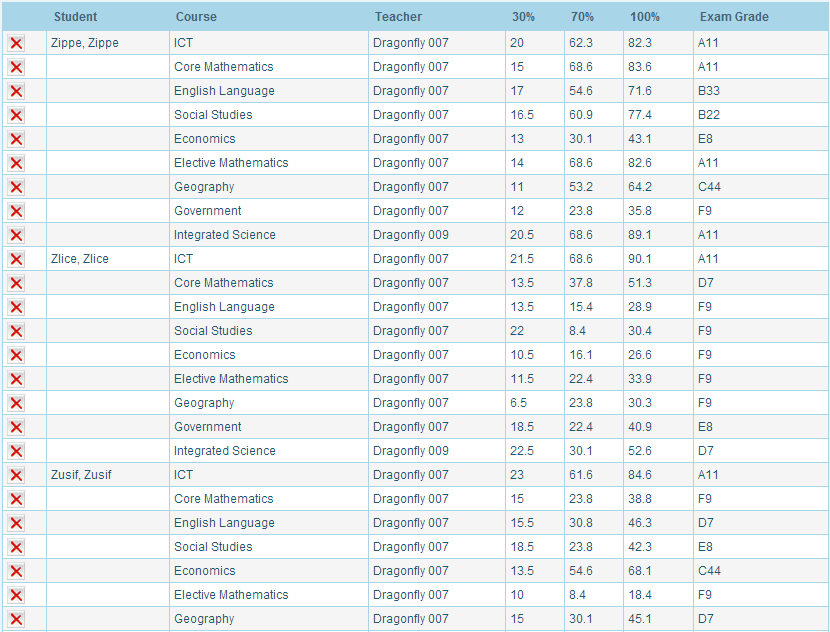
This tab allows you to get the grade lists for the students. As teachers entering students scores the administrator may be checking to see they are getting on with the system or to verify that teachers have entered scores for students. This will help the administrator to alert teachers who have not yet entered scores for students as well as those who haven’t completed their work. It also gives the admin a idea about how students are performing before printing report cards.
How to Print Students Final Grades
- Go to Grades –> Reports –> Students Final Grades
- After you click on this tab, perform a search by selecting the class you want to print their final Grades from “Class/Form” drop down in the main working area and click on “Submit” button.
- In the next page you will get the list of all the students for that particular class you selected
- Select a marking period
- Now if you click on “Create Grade List for Selected Students” you will get the grade list
Note: This report will be generated in the main working area. See an output of this report below
6.0 Setup
Before HAPASIS can generate all these powerfull reports discussed in this documentation, you will first need to do few configurations under the “Grades” tab. These settings are configured by default when you install HAPASIS. Since the default configuration may differ per your school requirement and your home region, you can modify it yourself to suit your school. The next pages will walk you though why need to do this configuration and how to do it step by step.
6.1 Class Work/Exam Percentage

- Class Work Percentage: Hapasis will scale all class work item to this percentage. It doesn’t matter the number of class work item or big the value you will enter for individual items everything will be converted to the percentage set here. In our example above, Hapasis will sum up all class items and convert it to 30% as shown above. For example if you have (assignment-1, assignment-2, class-test, project-work) as you class items, and then you enter these marks (5, 8, 10, 20) for them respectively, Hapasis will sum these class items {(5+8+10+20)=43} and convert their total {(43 * 30%)=12.9} as the Class Work Percentage. (see below how Class Items are configured)
- Exams Test Percentage: Hapasis will convert the total exams score entered to this percentage. Here also it doesn’t matter how big the value entered for class score it will be converted to the percentage set here.
- Total Percentage: Always make sure the sum of the “Class Work Percentage” and “Exams Test Percentage” is equal to this percentage set here. This will tell Hapasis that, this is there overall percentage we want you to use in accessing our students. In our example above, we are telling Hapasis that putting everything together (class & exam scores) covert everything to 100%.
Note 1: Make sure to “Save” any changes you make before leaving this pages
Note 2: This configurations here will not be seen by other users of hapasis aside the admin and does not restrict the user in any way from entering a higher value than what is begin configured here. This configuration is use by Hapasis in accessing students only. The “Class work Items” and “Exams Total Mark” restrict users from entering higher values.
6.2 Class Work Items
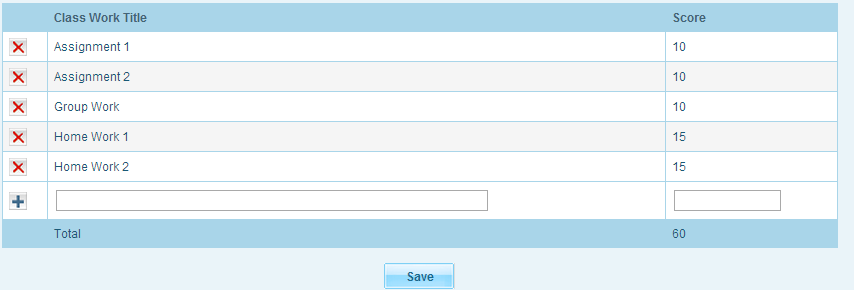
The Class work item provides a user friendly interface telling users (teachers) what to enter for each field and how much is allowed for each field. This will restrict users from entering a higher value or non required value. You can create as many Class work Items as your school may need. In creating class work item, you need to provide “class work title” and its “score”. The sum of all the class work items will be converted to the percentage previously set as “Class Work Percentage”. The score assigned to the class work title will tell users how much they are expected to enter and also prevent them from entering a value that exceeds the assigned score. (See the image below how the Class Work Items looks like when teachers login to enter scores for students)

6.3 Exam Total Mark

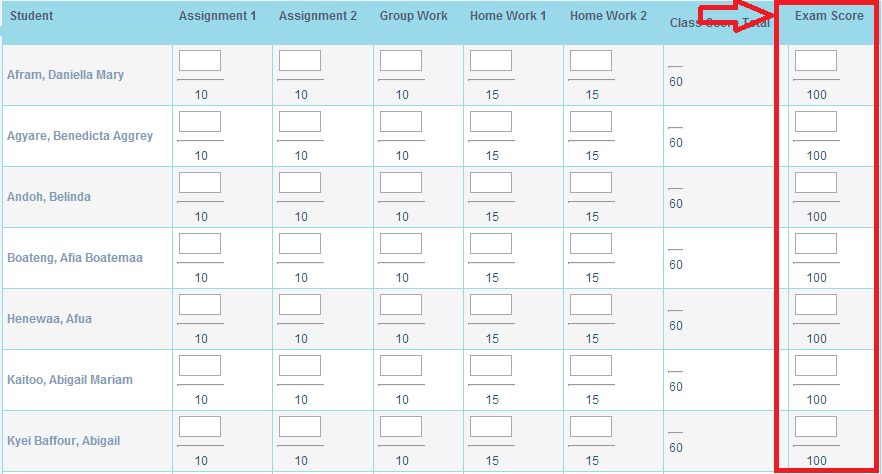
The Exam Total Mark also guide users (teachers) what to enter for exams score and how much is allowed for that field. This will restrict users from entering a higher value or non required value. The value entered here will be converted to the percentage previously set as “Exams Test Percentage”. This value tell users how much they are expected to enter and also prevent them from entering a value that exceeds the assigned score. (See the image below how the Exam Total Mark looks like when teachers login to enter scores for students)
6.4 Pass Mark
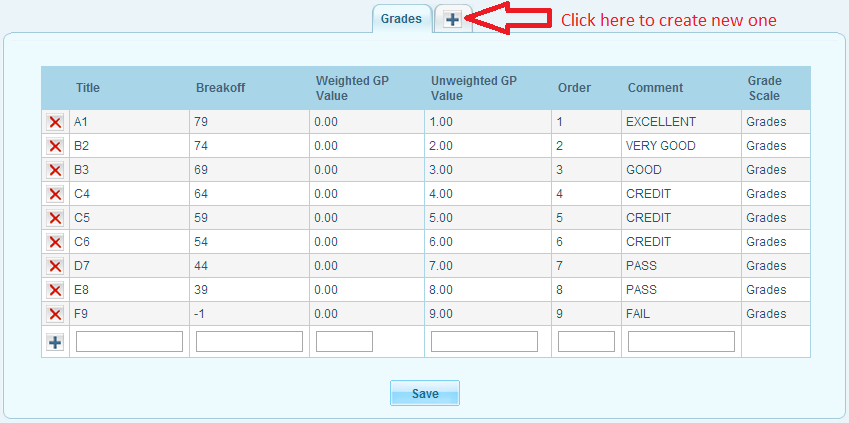
6.5 Report Card Grades
This option allows you to set up the report card grades. Unless you are setting it up teachers won’t be able to give grades to the students. You will have to give the title, break off, GP value, order and the comment and then click on save. After you create this you can grade the students.
Hapasis comes with a default grade scale per West African Examination Council’s (WEAC) requirements. You can edit it to suit you Schools’ grade setup or create a new one entily. There will be conflict between the default and what you have created, you have the option to select the one you want to use when creating course periods.
6.6 Conduct and Interest
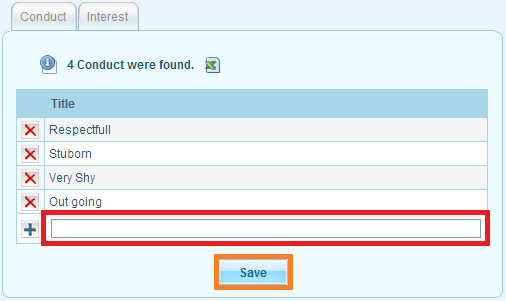
This tab allows you to create conducts and interest for the Report Card. You can create any number of conducts and interest here for all the courses. These conducts and interest created here will be available for form masters when they login. This will display as a dropdown and they can choose the one appropriate for a student. Form masters have the option to give different conducts or interest for different students and whatever you create that will show up in the Report Card. Apart from these hapasis has a default General tab where you will get the default conducts and interest.
How to add Conduct and Interest
- Select any tab as per your requirement (Conduct or Interest)
- Write the desired conducts or interest
- Click on Save button.