10.0 Billing
Fee module is specifically made for student’s fee billing, providing schools with powerful feature for both private and public institutions. Designed for ease-of-use and flexibility, the billing module will save your staff an enormous amount of time in collection, data entry and financial record keeping. It efficiently tracks the details of your past, future, and current fee receipts. Below are the attractive features of this module:
1.0 Fees Manager
This utility allows you to create student bills for different levels, different classes and different fee types/groups for example Admission fee, PTA dues, Boarding fees etc.
How to create Fee Categories and Fee Components
- Go to –> Billing –> Fees –> Fees Manager
- Click on
 to add fee category
 - Click on the “Save” button to save the category name
- After clicking on the save button,
 appears on the right for you to create the components
 - Click on to add fee component name and it’s amount
- Click on the “Save” button to save the component name and it’s amount
- You may add as many component as you want under a category
This option allows you to assign fees (categories & components created) to students. Using this option you can assign fees to number of selected students
How to Assign Fees to Students
- Go to –> Billing –> Fees –> Mass Assign Fees
- Click on to add fee category
- Perform your search criteria in the “Find a Student” working area and click on “Submit” button. (More information on how to use Find a student)
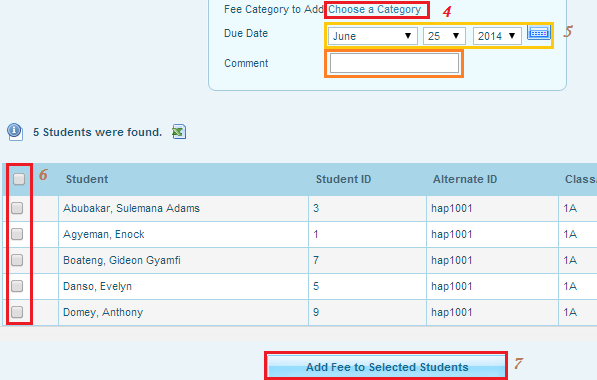
- Choose the category you want to assign to students (see image below)
- You may pick due date and also add some comment (see image below)
- Select the students you want to assign the selected category to (see image below)
- Click on “Add Fee to Selected Students” button to complete the operation (see image below)
- You will see a confirmation message saying “That fee has been added to the selected students”
1.2 Group Drop Fees
This option allows you to drop fees (categories & components ) that have been assigned to students. Using this option you can drop fees for number of selected students
How to Drop Assigned fees from Students Bill
- Go to –> Billing –> Fees –> Group Drop Fees
- Perform your search criteria in the “Find a Student” working area and click on “Submit” button to display the students you want to drop their fees (More information on how to use Find a student)
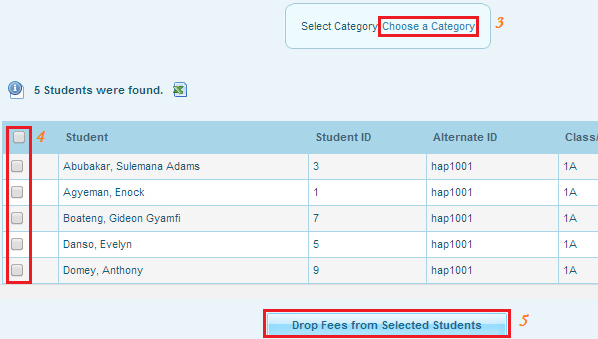
- Choose the category you want to drop from students bill (see image below)
- Select the students you want to drop their fees (see image below)
- Click on “Drop fees from Selected Students” button to complete the operation (see image below)
- You will see a confirmation message saying “That fee has been dropped from the selected students”
Note: Dropped fees are deleted from students bill, Use this utility with care
1.3 Payment Mode
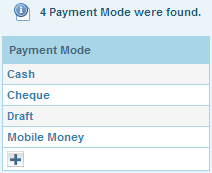
This utility allows you to create payment modes available and acceptable in your school. Payment modes may differ from school to school. See the examples below
- Go to –> Billing –> Fees –> Payment Mode
- Click on to add Payment Mode
- Click on the “Save” button to save you action
- You may add as many Payment Mode as you want that are acceptable in your school
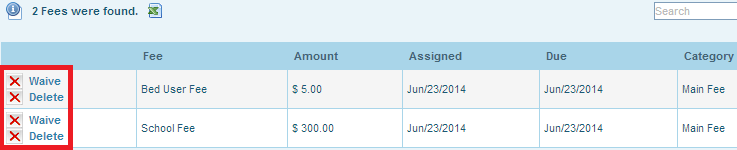
This option allows you to waiver or delete a fee that has been assigned to a student. A waivered fee will be deducted from students bill with the inscription “waiver” attached to it. You can always search for waivered fees
- Go to –> Billing –> Fees –> Student fees
- Perform your search criteria in the “Find a Student” working area and click on “Submit” button to display the students you want to Waiver or Delete their fees (More information on how to use Find a student)
- Click on the name of the student you want to waiver or delete his/her fee
- Fee components assigned to the student shall display
- Click on “Waiver” or “Delete” to waiver or delete the fee component from the student’s bill (see image below)
Students Payments allows you to make payments for students, Receipts can be printed right after making payment. Receipts can also be printed at anytime after payment.
- Go to –> Billing –> Payments –> Student Payments
- Perform your search criteria in the “Find a Student” working area and click on “Submit” button to display the student(s) you want to make payment(s) on their behalf (More information on how to use Find a student)
- Click on the name of the student you want to make payments on his/her behalf
- Enter the amount
- Select Date, Category, Mode of payment, you may also add comments
- Click on the “Save” button to complete the operation
- Click on the
 to print receipt
Note:
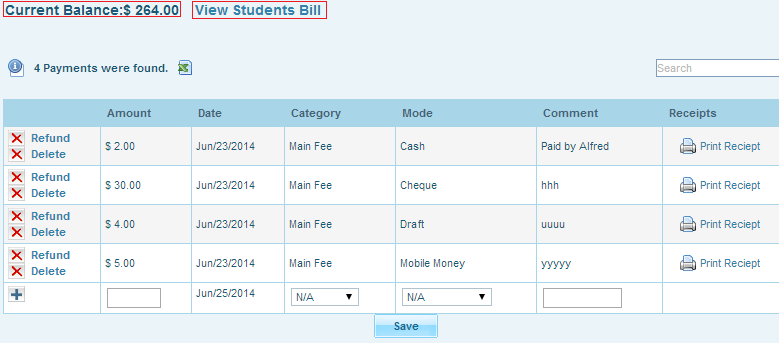
- You the advantage of seeing the student current balance at top of where your making payment. You can as well click “View Student Bill” to view the full bill (see image below)
- You shall see all the payments made by that students for that term (see image below)
- You can “Refund” or “Delete ” payment from this interface
1.6
Mass Assign Payments allows you to make payments for students in a situation where you have more than one student paying the same amount, Receipts can be printed right after making payment. Receipts can also be printed at anytime after payment.
Note: If students are not paying the same amount use “Student Payments” option.
How To Make Mass Assign Payment
- Go to –> Billing –> Payments –> Mass Assign Payments
- Perform your search criteria in the “Find a Student” working area and click on “Submit” button to display the students you want to make payments on their behalf (More information on how to use Find a student)
- Select the students you want make payment on their behalf
- Enter the amount
- You may also enter comments
- Click on the “Add Payment to Selected Students” button to complete the operation
- Your shall get a confirmation saying “That payment has been added to the selected students“
1.6
This option allows you to create and manage scholarships and Grants of any kind.
How to Create and Manage Scholarship or Grant
- Go to –> Billing –> Scholarships –>Scholarship Manager
- Enter the Scholarship or Grant name, Yearly amount and amount per Term/Semester
- Click on the “Save” button to save the scholarship
Note:
- You can create as many Scholarships or Grants as you need
- You may also delete scholarship or Grant from this interface, before you delete scholarship or Grant ensure that no student is benefiting from the scholarship or grant you are deleting or else Hapasis will prevent you from deleting such scholarship or grant.

1.6
Mass Assign Scholarship or Grant allows you to allocate scholarship or grant to students benefiting from scholarship or grant Using this option you can assign scholarship or grant to number of selected students .
How to Assign Scholarship or Grant to Students
- Go to –> Billing –> Scholarships –> Mass Assign Scholarship
- Perform your search criteria in the “Find a Student” working area and click on “Submit” button. (More information on how to use Find a student)
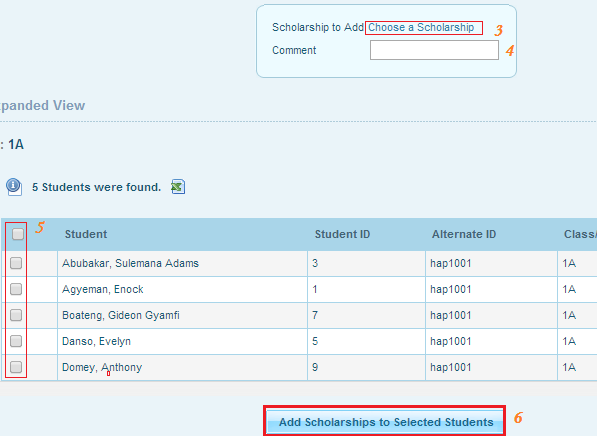
- Choose the scholarship or grant you want to assign to students (see image below)
- You may add comment in the comment field provided (see image below)
- Select the students you want to assign the selected scholarship or grant to (see image below)
- Click on “Add Scholarships to Selected Students” button to complete the operation (see image below)
- You will see a confirmation message
1.7 Group Drop Scholarship
This option allows you to drop Scholarship or Grant that have been allocated to students. Using this option you can drop Scholarship or Grant for number of selected students
How to Drop Assigned Scholarship or Grant from Students Bill
- Go to –> Billing –> Scholarships –> Group Drop Scholarship
- Perform your search criteria in the “Find a Student” working area and click on “Submit” button to display the students you want to drop their Scholarship (More information on how to use Find a student)
- Choose the Scholarship or Grant you want to drop from students bill (see image below)
- Select the students you want to drop their Scholarship or Grant (see image below)
- Click on “Drop Scholarships Students” button to complete the operation (see image below)
- You will see a confirmation message saying “That Scholarships has been dropped from the selected students”
Note: Dropped Scholarships or Grants are deleted from students bill, Use this utility with outmost care
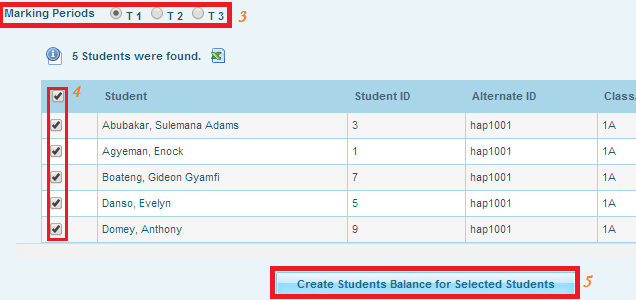
1.8 Students Balances
This utility allows you to print Students balance report for any number of students.
How To Print Student Balance
- Go to –> Billing –> Report –> Student Balances
- Perform your search criteria in the “Find a Student” working area and click on “Submit” button. (More information on how to use Find a student)You can search for students who are enrolled in a specific course by clicking the “Choose” link next to the “Course” search option and choosing a course from the popup window that appears.
- Before printing the report cards, you must select which marking periods to display on the report card by checking desired marking period check boxes.
- Select the list of students you want to print their Balances
- The report cards will be automatically generated in a printable PDF format when you click the “Create Students Balance for Selected Students” button.