5.0 Students
This option gives you all the necessary details of a particular student. After clicking on this tab you can use the filters provided in the main working area to search for students in diverse ways under the selected academic year in HAPASIS. This appears at many places and it works the same where ever you see it in HAPASIS. Few tips are provided below on how to use the “Find a Student” to search for students in HAPASIS.
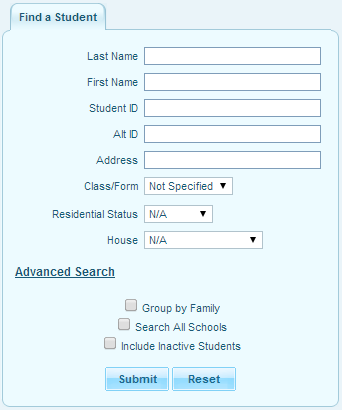
- When you click on “Submit” without selecting anything you will get the list of all the students in the current selected academic year.
- You can search for students by their Last Name, First Name, Student ID, Alternate ID (Alt ID) or their address. For example if you type in “Alice” in the “First Name” field and click on “Submit” button you will get the details of all students by the “Alice” as their first name in the School in the academic year in question. You can narrow your search by combining any of the fields for example “First Name” and “Last Name” or “First Name” and “Student ID” or “First Name” and “Last Name” and “Student ID” etc.
- You can select a specific “class” from the “Class/Form” drop down and will get the details of that class’s student. (You can do the same for House and Residential status)
- You can select a specific “class” from the “Class/Form” drop down and “Boarding” from the “Residential status” drop down and you will get the details of students who are in boarding in that particular class.
Note: You can combine any of the filters including the “Advanced Search” in you search.
5.2 Add Student
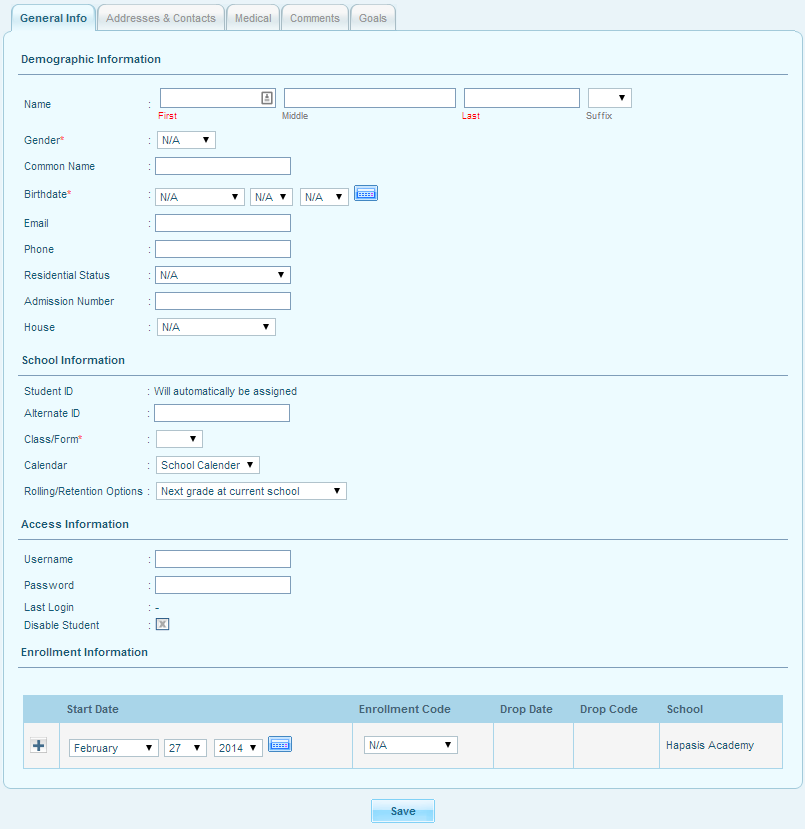
By clicking on this option you will get an empty form where you need to fill up all the required details then click on “Save” button and the details would be saved. Only the * marked fields are mandatory.
You get an option to upload a student’s photo after saving the details. You can always come back and edit the student details or change the photo at any time.
Here you get the general info, address and contact details, Medical details, comments and goals (if any) of that specific student. Note that all these forms are active only after saving the general Info.
5.3 Group Assign Student Info
This option allows you to change any details of a student. You can change any detail you want to in groups. Like you can select a bunch of students in one go and change any of their information. The change will show up in the student info page.
- After clicking on this option you can perform search by First, Last name, Class/Form etc.
- You will get a page where at the top from a drop down box you can select “All categories”, “General info”, “Medical”.
- Then you will have the text boxes, choose and type information as per your requirement.
- Then at the bottom of the page select the students you want to apply the changes to their details by ticking in the check boxes beside and click on the “Save” button.
- Now the information is changed for the group of students you selected. The change will show up in the student info page.
5.4 Associate Parents with Students
5.5 Import Students
This option allows you to import list of students into HAPASIS with all theirs details on a single predefined “CSV” file. This option reduces your work by manually entering students one by one.
To Import Students
- Download the predefined “CSV” file
- Fill in the students details and save the file
- Go to Students —> Import Students; you will see the image below.
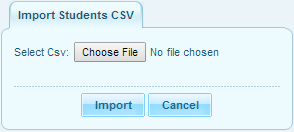
- Click on “Choose File” a popup window will open
- Browse and pick the “CSV” file from your computer
- Click on “Import” to import the “CSV” file
- You will be notified by the number of students that have been successfully imported
5.6 Export Students
This option allows you to export exactly the same details you imported in the section (5.5 Import Students). You can use search option to specify what data you want to export.
5.7 Reports
5.7.1 Advanced Reports
This option allows you to create a special report as per your requirement. After clicking on this tab you will get a search option.
If you think you need to create a report which will show up the details of only Class/Form (Grade). Then you need to select the Class/Form (Grade) option. Now perform the search, you will get the student list for that particular grade.
Now if you click on “Create Report for Selected Students”, it will give you an option to choose what details you want in the report
Here you have General, Address, General Info, Medical and Schedule, now tick the boxes as per your requirement and again click on “Create Reports for Selected Students”. Your report is ready with all the necessary information you wanted.
5.7.2 Add/ Drop Reports
This option allows you to prepare a report which shows a student’s enrolment and the drop date in the school. After you click on this option you will get a page showing list of recent enrolment details. At the top of it you will have to select a specific date range then click on “Go”. You will get the student list with the Students’ name, Student ID, School Name, Enrolment Code and Drop Date. Here you get an option of creating an export to excel sheet as well.
5.7.3 Print Letters
The “Print Letters” page allows you to print formal letters for any number of students.
To print the letters
Enter the letter content in the “Letter Text” text field at the bottom of the search screen. Then search for students by filling in any desired search field, and click the “Submit” button.
You can insert certain pieces of student information into your letter with special variables:
- Full Name: __FULL_NAME__
- First Name: __FIRST_NAME__
- Middle Name: __MIDDLE_NAME__
- Last Name: __LAST_NAME__
- Student ID: __STUDENT_ID__
- Grade: __GRADE_ID__
Also, you can choose to print the letters with mailing labels. The letters will have mailing labels positioned in such a way as to be visible in a windowed envelope when the sheet is folded in thirds. More than one letter may be printed per student if the student has guardians residing at more than one address.
The letters will automatically give you a printer-friendly html format when you click the “Submit” button.
5.7.4 Print Mailing Labels
This tab helps you to create mailing labels for selected students.
To Print Mailing Lables
- Go to Students —>Reports —> Print Mailing Labels
- Perform your search for the students you want to print their mailing labels. As per your search criteria it will give you the student list.
- Click on “Submit” button
- In this page you have 4 options to choose from whom the mailing will be address to. These options are “To Student”, “To Primary Emergency Contact”, “To Secondary Emergency Contact”, and “To Both Emergency Contacts”.
- Indicate the placement of the mailing label on paper by using the “Starting row” and “Starting column” at the upper top right corner. The default is “1” for both starting row and column.
- After selecting the option, click on “Create labels for selected students” you will get the mailing labels for those selected students.
5.7.5 Print Students Labels
This tab helps you to create student labels. If you click on this option you will get the student list and you will also get 2 options to choose attendance teacher, attendance room. The student label will show up that information. You can also take a print out of the details.
5.7.6 Print Student Info
This page allows you to print students’ basic information such as General Info, Addresses and Contacts, Medical, Comments and Goals.
To Print Student Info
- Go to Students —> Reports —> Print Student info
- If you click on this tab you will get a search option, you need to perform a search and as per your search it will give you the student list.
- At the top of the next page you will have five options (General Info, Addresses and Contacts, Medical, Comments and Goals).
- Now you can choose any of those options and then select students as per your requirement.
- Now if you click on “Print Info For Selected Students” you will get a print view containing all the selected students with their details. You can also take a print out of that.
5.7.7 Print Student Contact Info
This page allows you to print students’ basic contact information such as Guardian’s (address, names, cell phone, work phone, home phone)
To Print Student Contact Info
- Go to Students —>Reports —> Print Student contact info
- Clicking on this tab you will get a search option, you need to perform a search and as per your search criteria it will give you the student list.
- Now you can select students as per your requirement.
- Click on “Print Contact Info For Selected Students” you will get a print view containing all the selected students with their contact details. You can also take a print out of that.
5.7.8 Print Goals and Progresses
This page allows you to print students’ Goals and Progresses.
- Go to Students —> Reports —> Print Goals and Progresses
- If you click on this tab you will get a search option, you need to perform a search and as per your search it will give you the student list.
- At the top of that page you will have a Date Range to select. Select the Date Range and select the students as per your requirement
- Click on “Print Info for Selected Students” you will get a print view containing all the selected students with their Goals and Progresses. You can also take a print out of that.
5.8. Setup
5.8.1 Student Fields
This option allows you to create a new student field and it will be added in the student information page.
To Add Student Fields
- Go to Setup —> Student Fields
- Click on add icon to create a new field
- Give a “Title” and a “Sort Order” then click on the “Save” and you have successfully created a new student field.
- Now (if you want) you can create a Field under the new student field category. Here in this page you will have to give the “Field Name”, the “Data Type”, “Sort Order”, and if you check the “Required Box” it would be a mandatory field to fill up while adding a student into the system.
To Delete Student Fields
- You can also delete this field that you created if you don’t require it anymore.
- Select (click on) the field you want to delete
- Click on “Delete” button at the top right corner
- It will ask for a confirmation, click on “OK” and that particular field will be deleted.
5.8.2 Enrolment Codes
Enrolment Codes are used in the Enrolment Codes student screen, and specify the reason the student was enrolled or dropped from a school. These codes apply to all schools system-wide. The “Enrolment Codes” page allows you to setup your school’s Enrolment Codes.
To add an Enrolment Code
- Fill in the Enrolment Codes code’s title, short name, and type in the empty fields at the bottom of the Enrolment Codes list.
- Click the “Save” button.
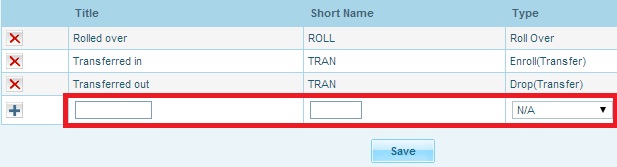
To modify an Enrolment Codes code
- Click on any of the Enrolment Codes code’s information,
- Change the value, and click the “Save” button.
To delete an Enrolment Codes code
- Click the delete icon
 next to the Enrolment Codes code you want to delete.
 - You will be asked to confirm the deletion.
- Click “OK” button to confirm.